Showing posts with label how. Show all posts
Showing posts with label how. Show all posts
Monday, February 17, 2014
How to Clear Clogged HP Ink Cartridges
When a printer isn’t used often, sometimes the ink dries up inside the cartridge and this results in it not working properly. Using the print cleaning option under utility can often times work in cleaning the cartridge, but at times, it doesn’t always do the trick. After trying five or six times to clean it that way, you’ll need to do it manually. Fortunately, this is an inexpensive process that requires rubbing alcohol and water.
The first step is to take hot water and submerge the cartridge. Allow it to sit for a little while so that the water can go in and break up any of the ink. Once this has finished, allow it to dry over night and then put the cartridge into the printer. Use the self clean feature on the printer again. If this works, the cartridge has been unclogged and you can go about your business.
Unfortunately, if it doesn’t work, you’ll have to try rubbing alcohol. Submerge the cartridge in rubbing alcohol and allow it to sit overnight. Remove it and dry it down caully. The thing to note about rubbing alcohol is that it evaporates very quickly, so once removed from the container, it’ll be dry within ten minutes. Pat it down with paper towel to get any remaining drops of alcohol.
Place it into the printer and try the self cleaning again. Most of the time, the hot water and then the alcohol will be enough to break up the ink. Once the ink has been broken up, the self cleaning feature will be able to handle the remaining cleaning. However, if this doesn’t work, chances are, the cartridge is completely clogged and you’ll have to purchase a new one.
The best way to ensure that the ink cartridges don’t get clogged in the future is to print something–both in black and color–at least once a week. This way, the ink is being used and doesn’t just sit in the cartridge building up. And, it doesn’t hurt to do the self cleaning utility once every couple of weeks to ensure that there are no blockages. If there are, repeat the above steps.
ReadMore..
The first step is to take hot water and submerge the cartridge. Allow it to sit for a little while so that the water can go in and break up any of the ink. Once this has finished, allow it to dry over night and then put the cartridge into the printer. Use the self clean feature on the printer again. If this works, the cartridge has been unclogged and you can go about your business.
Unfortunately, if it doesn’t work, you’ll have to try rubbing alcohol. Submerge the cartridge in rubbing alcohol and allow it to sit overnight. Remove it and dry it down caully. The thing to note about rubbing alcohol is that it evaporates very quickly, so once removed from the container, it’ll be dry within ten minutes. Pat it down with paper towel to get any remaining drops of alcohol.
Place it into the printer and try the self cleaning again. Most of the time, the hot water and then the alcohol will be enough to break up the ink. Once the ink has been broken up, the self cleaning feature will be able to handle the remaining cleaning. However, if this doesn’t work, chances are, the cartridge is completely clogged and you’ll have to purchase a new one.
The best way to ensure that the ink cartridges don’t get clogged in the future is to print something–both in black and color–at least once a week. This way, the ink is being used and doesn’t just sit in the cartridge building up. And, it doesn’t hurt to do the self cleaning utility once every couple of weeks to ensure that there are no blockages. If there are, repeat the above steps.
Sunday, February 16, 2014
How to Refill an HP Inkjet Cartridge
The most expensive part of buying an inkjetcartridge is the actual cartridge. The ink is much cheaper and theore, buying illing your old cartridges rather than buying new ones, you are able to save money that can be used on other things. The only problem with illing cartridges is that there are so many different types that HP creates, so the plan of attack might vary. For the most part, though, it is the same across the board.
Refilling the Cartridge
Before you begin to ill the cartridge, make sure that the space you are working on is not a cherished space. Ink stains and theore, if you spill, it will ruin furniture. To prevent against this, lay out old rags. The rag will soak up the ink before it gets to the furniture.
Once you have your ink replacement and youve got the individual cartridges, you can get to work. The first step is to locate the hole in which the ink will be placed in. This is usually on the top or the bottom of the cartridge. Look for a plastic film because this is typically where the hole is.Refill an HP Inkjet Cartridge
Using a small, non-medical syringe, insert the ink into the cartridge. For black ink, it is best to use around 20 milliliters. For color, use about 10 milliliters for each chamber. Before going from color to color, be sure to clean out the syringe as much as possible to ensure that the colors dont mix and create an ugly color that isnt desired for printing.
Squeeze the sides of the cartridge and try to get a few drops of the ink to drop from the print head. This way, you know that the ink has reached the bottom of the cartridge. Then, allow it to stand with the print head down for a few moments. What you are doing here is getting rid of any excess ink and allowing the pressure to equalize within the cartridge. Once youve done this, put the cartridge back into the printer and do a test print. If the print looks good, youve done a successful ill.
ReadMore..
Refilling the Cartridge
Before you begin to ill the cartridge, make sure that the space you are working on is not a cherished space. Ink stains and theore, if you spill, it will ruin furniture. To prevent against this, lay out old rags. The rag will soak up the ink before it gets to the furniture.
Once you have your ink replacement and youve got the individual cartridges, you can get to work. The first step is to locate the hole in which the ink will be placed in. This is usually on the top or the bottom of the cartridge. Look for a plastic film because this is typically where the hole is.Refill an HP Inkjet Cartridge
Using a small, non-medical syringe, insert the ink into the cartridge. For black ink, it is best to use around 20 milliliters. For color, use about 10 milliliters for each chamber. Before going from color to color, be sure to clean out the syringe as much as possible to ensure that the colors dont mix and create an ugly color that isnt desired for printing.
Squeeze the sides of the cartridge and try to get a few drops of the ink to drop from the print head. This way, you know that the ink has reached the bottom of the cartridge. Then, allow it to stand with the print head down for a few moments. What you are doing here is getting rid of any excess ink and allowing the pressure to equalize within the cartridge. Once youve done this, put the cartridge back into the printer and do a test print. If the print looks good, youve done a successful ill.
Thursday, November 28, 2013
How to Reset Epson Stylus 660
 This procedure is to reset the Epson Stylus 660 printer when are the lights will blink and will not let you print.
Para realizar el reset lo que tiens que hacer es lo siguiente: To perform the reset tiens what to do is the following:
Hay que presionar y mantener apretado el boton de LOAD/EJECT (tomar hoja) y el de Cleaning (limpieza) . We must press and hold the button LOAD / EJECT (take up) and the Cleaning (cleaning).
Mientras mantienes apretados esos botones , tienes que presionar el boton de POWER (encendido) y tenerlo apretado hasta que las luces (ink out – tinta vacia y paper out- falta papel) empiezan a titilar o parpadear. While holding these buttons, you must press the power button (on) and keep it tight until the lights (ink out - empty ink and paper out-out of paper) start to flash or flicker.
Cuadno suceda esto suelta todos los botones. When it has to happen this release all buttons.
Cuando pasen 3 o 4 segundos apreta y mantenlo apretado el boton de CLEANING (limpieza) hasta que las luces que titilaban dejen de hacerlo. When you spend three or four seconds click and hold down the button CLEANING (cleaning) until the lights flickered stop.
YA ESTA!!! NOW THIS! ya quedo lista para usarla!! and am ready to use!
Seria conveniente que cada vez que se haga este procedimiento hacer una limpieza a la esponja interna de la impresora, por que alli deja depositado todo el exceso de tinta de la impresora y podria derramarse. It would be desirable that each time you do this procedure done to clean the sponge inside the printer, because there left on deposit all excess ink from the printer and may spill. Esto no es 100 % necesario pero seria muy bueno que lo hagas. This is not 100% necessary but it would be very good to do so.
Tuesday, November 26, 2013
How To fix Error 60 02 on HP Laserjet 4250 series

It appears that the spring which holds the lifter motor upright was designed without enough tension on it.
If the spring is removed and the motor assembly is allowed to fall to the right when the paper tray is inserted the motor never engages the tray and an error 60.02 appears.
However if the motor assembly is held upright while the tray is inserted the error message never appears as the motor always engages.
Monday, November 25, 2013
How To fix Canon LBP2900 Error Code E100 0000

Canon LBP2900 E#100, ERR 100 or E100-0000: thats a laser scanner unit error.
Procedure 1:
Turn off the printer, wait 10 minutes, and then turn it on again.
Procedure 2:
Flip open the top of the printer.
Look for a small shutter that holds the laser: carefully force this open with your hands and force the laser out into the center of the tracking cradle.
After you move the laser, unplug the printer for a few minutes.
Plug the printer back in.
Sunday, November 24, 2013
How To fix HP Laserjet 49 errors
The HP laserjet 49 errors are a firmware error, it might be caused by the firmware itself, or by the failure of a printer module.
How to isolate the cause:
Verify that the problem is not being caused by a specific job, this error can be caused by bad information being sent to the printer.
Power off and remove any installed EIO devices, (JetDirect Cards, Hard Drives), power on and test.
Cold Reset the printer:
Power off, remove any optional memory, power on and retest.
Power off and reseat any memory and firmware modules on the formatter board, power on and test.
Power off, reseat the formatter board, power on and test.
Check firmware version:
On newer machines with flashable firmware upgrade to the latest version. If you are running the latest version reload it, this might fix corrupted firmware. (Some printers have flashable firmware, others use a Firmware DIMM which must be replaced to upgrade.)
If you havent found the cause yet, it could be:
The firmware module if its a DIMM as opposed to being part of the formatter.
The memory if installed, some printers have to have at least one memory module installed to run, and it must have enough capacity to function, in some cases installing a module that does not meet the minimum requirements of the machine will cause a 49 error
Wednesday, November 20, 2013
How to fix USB001 Operator error on hp epson canon brother printers

Solutions for "USB001 Operator error":
Procedure 1:
Disconnect the USB cable and the power cable from the printer.
Power off the printer and the central unit.
Wait a minute.
Connect the power cable to the printer.
Power on the printer and open the cover.
Power on the central unit and connecte the USB cable to the printer.
Closer the cover.
Procedure 2:
Uninstall the driver of the printer
Reinstall the driver.
Procedure 3:
Try another USB port.
Procedure 4:
The electronical car of the printer may be faulty.
Tuesday, November 19, 2013
Know How to Reset Samsung ML 1640 ML 1641 ML 1645 laserjet printer

Know How to Reset Samsung ML-1640, ML-1641, ML-1645 laserjet printer
"How to reset samsung ML-1640, ML-1641, ML-1645 toner chip, samsung ML-1640, ML-1641, ML-1645 error light, samsung ML-1640, ML-1641, ML-1645 red light,error samsung ML-1640, ML-1641, ML-1645"
Printer Samsung ML-1640, ML-1641, ML-1645 is an very good laser printer in very less cost. But the problem is that, when we refill the cartridge with toner it doesnt print
giving red flashing led and will ask for changing the toner cartridge(New Toner Cartridge Is Costlier So, you can save money by simple resetting your
printer)
How to Reset Samsung ML-1640, ML-1641, ML-1645 laserjet printer? Do the steps below..
1. Open the back cover of the printer by unscrew 2 nuts.

2. There are 2 PCBs inside, which one is the Power supply circuit board and other is main printer board i.e., green color.
3. Find a small eprom 93C66 IC (8 pin) in Green Printer Board.

4. Connect PIN 1 and 4 of the IC 93C66 with a small cable and solder it.


5. Then make sure all the cables are plugged back, and turn on the printer Samsung ML-1640, ML-1641, ML-1645.
6. Wait a few moments until the Samsung ML-1640, ML-1641, ML-1645 Printer calibration is complete and the lights flash green.
7. After a light green flame, turn off the printer.
8. Disconnect the small cable that connects pin 1 and 4 IC 93C66.
9. Close the printer Samsung ML-1640, ML-1641, ML-1645, do not forget to attach the screw.
10. SamsungML-1640, ML-1641, ML-1645 printer is ready for use again.
Thursday, November 14, 2013
How to Reset Waste Ink Counter Epson CX7300 CX8300 and CX9300F
Reset waste ink pad counter epson CX7300, CX8300 and CX9300F use adjustment program. I have tried this software and this software worked. To run this software without error please follow the tutorial under. I have modified the bat file and I change the name tricks-collections.bat to assist when running program adjustment.
Here How to use this software :
Download Adjustment program for epson CX8300
Download Adjustment program for epson CX9300F
Here How to use this software :
- Download the adjustment program (see under)
- Extrak adjustment you have downloaded
- Go to The extrakded folder then click tricks-collections.bat file
- Now set the date setting in you PC to 11 April 2008,
- Run adjustment program by click AdjProg.exe file the click accept
- Click Particular adjustment mode then select destination and printer port then click OK
- Select Waste ink pad counter from the below window and double-click to execute it
- Click [Check] button to check current protection counter’s value.
- Then Click [Initialization] to reset the protection counter to the initial value. Thats all.
- After finishing, you can change the date to normal.
Download Adjustment program for epson CX8300
Download Adjustment program for epson CX9300F
Wednesday, November 13, 2013
How To reset the protection counter of Epson Stylus C77 Resetter
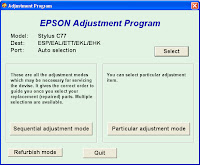
Epson C77 Adjustment Program
FIX PRINTER ERROR "parts inside printer end service life, waste ink pad counter overflow error"
Please follow the steps below to reset the protection counter effectively.
- Double click AdjProg.exe.
- Click “Accept” button.
- Click "Select" button. and select your printer model then click "OK"
- Click “Particular adjustment mode” button.
- Select on “Waste ink pad counter” and click “OK” button.
- Click on “Initialization” button and the program will reset the protection counter.
- Turn off the printer as a program instructed then turn on again.
- Click “Finish” button. and its done!
Warning: You might end up with ink leaking out of the printer if you dont either replace the waste ink pad or install external waste bin.
Sunday, October 20, 2013
How to reset Brother DCP 195C printer clean unable 46 unable to print clean pad is full

clean unable 46
unable to print clean pad is full
Here is the proper reset code sequence to reset DCP printers without numeric keypad:
This instruction is also applicable to printer model: Brother DCP 110C, 115C, 120C, 130C, 135C, 145C, 150C, 165C, 185C
1. Press the Menu, then Mono Start key then press the UP arrow key 4 times to make the machine enter the maintenance mode and "ERROR 46" pops-up in the display.
2. Enter maintenance mode 80: Select 8 by pressing the UP/DOWN arrow key and push OK key and select 0 and push OK key
3. Now Press MONO arrow key several times until you see PURGE:XXXXX
4. Select 2 and push OK, Select 7 and push OK, 8 and push OK, select 3 and push OK and the purge counter is now reset to 00000.
5. Press STOP/EXIT key to go to root of maintenance mode
6. Enter code 99 to exit maintenance mode: Select 9 and push OK, Select 9 and push OK.
Tuesday, October 8, 2013
How to Reset Canon MP600
Manual reset waste ink counter pad and reset to factory setting for canon MP600 printer.
Reset Counter MP600
ReadMore..
Reset Counter MP600
- Turn off the printer
- Press and hold the Resume Button, add a printer an indicator light green.
- Press and hold the Power Button, while hold Power button, release the Resume Button.
- While hold the Power Button, double click Resume button and then Release Both Buttons.
- Click Resume for Four times.
- Once you click Power, to confirm the selected action (reset counter absorber).
- Turn off the printers.
- Press the HOME button.]
- Use the Easy-Scroll Wheel or the right/left arrow to select Settings, and then press OK button.
- Use the Easy-Scroll Wheel or the right/left arrow to select Device settings, then press the OK button.
- Use the Easy-Scroll Wheel (B) or the up/down arrow to select Reset settings, then press the OK button.
- Use the Easy-Scroll wheel or the up/down arrow to select Yes on the confirmation screen and then press OK.
- Press the HOME button to return to the HOME menu.
Thursday, October 3, 2013
How to Reset Canon i80 Waste Ink Tank Full
This tutorial to reset waste ink in the printer canon i80. I not yet tried this tutorial, because this tutorial is I get from forum service printer. following step bt step to reset printer Canon i80 :
ReadMore..
- Close the print head cover, and turn off the printer.
- While pressing the Resume/Cancel button, press the Power button *.
- While holding the Power button, release the Resume/Cancel button **.
- While holding the Power button, press the Resume/Cancel button three times, and then release the Power and Resume/Cancel buttons ***. During initialization, the LED blinks in green.
- When the LED stops blinking and lights in green, press the Resume/Cancel button the 4 times ***.
- Press the Power button. The LED lights in green, and the selected function is performed. When the operation completes, the printer returns to the menu selection mode automatically.
- Power off the printer and then back on and test.
- (Do not release the buttons. The LED lights in green to indicate that a function is selectable.)*
- (Don’t release the Power button.)**
- (Each time the Resume/Cancel button is pressed, the LED lights alternately in either orange or green, starting with orange.)***
Monday, September 16, 2013
How to Reset the protection counter of Epson T13 and ME32 printer
.png)
Please follow the steps below to reset the protection counter effectively.
- Double click Adjprog.exe.
- Click “Accept” button.
- Click "Select" button. and choose your printer model then click "OK"
- Click “Particular adjustment mode” button.
- Select on “Waste ink pad counter” and click “OK” button.
- Check on Main pad counter and click on “Initialization” button and the program will reset the protection counter.
- Turn off the printer as a program instructed then turn on again.
- Click “Finish” button. and its done!
Warning: You might end up with ink leaking out of the printer if you dont either replace the waste ink pad or install external waste bin.
Sunday, September 15, 2013
Reset the protection counter of Epson R260

FIX PRINTER ERROR "parts inside printer end service life, waste ink pad counter overflow error"
Please follow the steps below to reset the protection counter effectively.
- Double click AdjProg.exe.
- Click “Go on” button.
- Select your printer model then click "OK"
- Select on “Waste ink pad counter” and click “OK” button.
- Click on “Initialization” button and the program will reset the protection counter.
- Turn off the printer as a program instructed then turn on again.
- Click “Finish” button. and its done! Download
Subscribe to:
Posts (Atom)